Need to know how to loop a timeline in expression blend? Here is how!
in the objects and timeline click the arrow next to the object you are animating. If there is something in the drop down with another arrow click it.. repeat! The ones that do not have arrows you will be able to right click them and set the repeat count to whatever you want. There is a little icon when you set the repeat count that will let you set it to infinite if needed.
Thursday, December 6, 2007
Wednesday, November 28, 2007
How to center a control or object within a grid within the page
I have a grid with a control in it. I want the control ( or object ) to be centered in the grid when the window is expanded. This is how I did it:
The grid
Width is set to : Auto
Height to: 705.5 (yours will be different, it is whatever you want/need)
Row 1
Row Span 1
Column 0
ColumnSpan 2
Horizontal Alignment Center
Vertical Alignment Center
Margin
<--172.176
-->2.131
(up)10
(dwn)-22.5
My control :
Width 533
Height 600
Row 0
Row Span 1
Column 0
Column Span 1
Horizontal Alignment Stretch
Vertical Alignment Stretch
Margin
<--41.25
-->48.75
(up3.25
(dwn)102.25
Friday, October 26, 2007
timeline does not automatically play. Stop Timeline
Took me a long time to figure this one out!
When you create a new timeline, Blend creates by default an Event trigger which starts the animation when the scene is loaded.
Here is how you can delete it:-
open the Triggers palette- select the "Window.Loaded" event; (the bottom area of the palette will show all the actions for the "Window.Loaded" Event trigger)- click on the "-Trigger" button
In a similar way you can add an Event Trigger to start the animation when the button is clicked:- create the button- select the button- click on "+ Event"- select "button" in the first field (when button) and Click in the second field (in the end it will say: When button.Click is raised)- click on the "+" button- select Storyboard1.Begin as the action
You may also start the animation from code if you want: - add an Event in the property inspector OnButtonClick to the button - insert the following code (replace Storyboard1 with the name of your storyboard private void OnButtonClick(object sender, RoutedEventArgs e) { Storyboard storyboard = this.FindResource("Storyboard1") as Storyboard; storyboard.Begin(this); }
Thanks Adrian! You helped out a ton!
Thursday, October 18, 2007
Slider binded to text block with NO DECIMALS!
put this:
IsSnapToTickEnabled="True"
into your XAML for the slider
(right click the slider and click view XAML.. then put that into the part of XAML for the slider)
Works great.. no decimals or extra numbers!
Expression Blend
IsSnapToTickEnabled="True"
into your XAML for the slider
(right click the slider and click view XAML.. then put that into the part of XAML for the slider)
Works great.. no decimals or extra numbers!
Expression Blend
Monday, October 15, 2007
Flash in blend
here is the only tutorial I have ran across so far that teaches how to put flash in blend (by making a flash player)
http://blogs.msdn.com/jijia/archive/2007/06/07/wpf-flash-activex.aspx
Its in another language but there is a ton of pictures and a tiny bit of english.. good luck!
http://blogs.msdn.com/jijia/archive/2007/06/07/wpf-flash-activex.aspx
Its in another language but there is a ton of pictures and a tiny bit of english.. good luck!
Slider that changes text block value
1. Make a slider (in the asset library) and name it "mySlider"
2. Make a text block name it "myTextBlock"
3. Click the small square in common properties tab next to text field
4.In the context menu, click Data Binding.
5.The Create Data Binding dialog box appears. On the Element Property tab, choose the mySlider (in the Scene elements column).
6.In the column to the right, choose the property Value.
7.Click Finish. An orange border appears around the text box of the property that has been bound
Im working on figuring out how to make it not use decimals
Monday, October 1, 2007
TimeLine Changes
Here is something very important I learned today about timelines by reading the user guide:
Ease In The ease in value modifies how the property value changes as time approaches the keyframe. You can set the degree of ease by specifying a value between 0% (no ease) and 100% (full ease, which is half the time distance between the previous keyframe and the edited keyframe).
Ease Out The ease out value modifies how the property values changes as time moves away from the keyframe. You can set the degree of ease by specifying a value between 0% (no ease) and 100% (full ease, which is half the time distance between the edited keyframe and the next keyframe).
Hold Out Hold out doesn’t interpolate changes over time; rather it makes an abrupt change to the new property value when the play head reaches the keyframe where the change occurs.
Linear Linear interpolation changes the property value in equal increments between the keyframes. The interpolation between two keyframes will be linear if the Ease Out value is 0% for the first keyframe and the Ease In value is 0% for the second keyframe.
You can modify keyframe interpolation values by right-clicking a keyframe on the timeline.
What I was trying to figure out was how to make a little icon stop changing inbetween frames. For example I have a picture of a cloud on frame 1 and would like it to be invisible on frame 5. my problem was on frames 2 to 4 it would slowly change to invisible instead of only changing on frame 5 to invisible all of a sudden like I wanted it to. So what I found the solution to be was on the keyframe(white circle thing) before the keyframe of the change I had to right click it and click on "hold out". Which makes nothing happen UNTIL frame 5 like I wanted. sheesh! Just remember to right click the key frame before instead of the keyframe you wanted the abrupt change on. Make sense?
Sunday, September 30, 2007
Another Link
www.learnexpressionstudio.com
Another great site too learn Expression Blend! I hear they have video tutorials
Another great site too learn Expression Blend! I hear they have video tutorials
Tuesday, September 18, 2007
Mouse Over text color change
This is what Fred told me over at the expression forum.. thanks a ton!
If you want to change the color when the mouse is over the combobox, you need the IsMouseOver event.Click on the +Property button in the triggers panel and a new trigger is added. Choose the IsMouseOver event from the list, and change the foreground color.
Or as we say in xaml...
A nice tool to help you with editing styles and templates is called ShowMeTheTemplate. You can download it from http://www.sellsbrothers.com/tools/.This program shows you the content of every component.
Saturday, September 15, 2007
combo box pop up color change
To change the color of the text in the pop up list thingy of your cobobox: find the combobox in your objectsAndTimeline... press the little arrow next to it.. choose the words you would like to change the coor of.. change the color in properties! YAY!
Change text color of combobox button when pressed
To change a combo box text color when it is pressed:
Go into the template of the combobox, into template of [toggle button], find your text block (if it is a content presenter change it to a text block instead) and look at the interaction,triggers panel.. find the trigger that says "IsChecked=True". Click it so it will then be recording... now change the color of your text block under properties.. TAADAAA!!! Test it out!!
Im working on how to change the rollover color as well instead of just the click color change...
Friday, September 14, 2007
Wednesday, September 12, 2007
make your OWN button!
Want to make your OWN button with an icon or a picture in it?? draw it out...group it all together (if you have more than one pieces that make up the button) then go to "tools", "make button". Name it and there ya go.. a brand new shiny button!!!!
*Any questions? Leave a comment!!
*Any questions? Leave a comment!!
Sizing an Imported/Referenced User Control
To size a user control once it has been imported into a project just click it then go to its properties panel and transform, scale and mess with the x and y. It leaves unwanted extra space when scaled to be smaller but that can be fixed by using layout, margin.
Sunday, July 29, 2007
NEWS FLASH!!
I downloaded a program the other day that lets me record what I do on my monitor. So as soon as I get a microphone I will be well on my way to giving you all some great video tutorials on blend!!
Monday, July 23, 2007
Wont open in design view? Error message?
If you ever have a problem viewing your project in design mode because all it shows is an error message telling you there is something wrong in the XAML.. then look at the results panel.. it will show you the error and you may double click on it so it will take you to the error in your XAML.
I learned this today because My project for work all of a sudden crashed when I changed a trigger event. Shows me I better start backing up my work more often!! I suggest you do too due to blend being so new and still having a few bugs here and there!
I learned this today because My project for work all of a sudden crashed when I changed a trigger event. Shows me I better start backing up my work more often!! I suggest you do too due to blend being so new and still having a few bugs here and there!
Sunday, July 22, 2007
workspace

Please open up Expression Blend and start a new project (wpf application) named whatever you would like. press f7 so your work space looks like mine.
K so when Expression Blend is first opened it looks very nice and pretty. But when looked at a little closer you will start to see how it can be very confusing and then you will start to notice that you want to cry... But dont give up!!! Simple things first. The tools are on the left!! They are what you will be using the most. If you want details on what each one does please click on help then user guide then the workspace-toolbox.
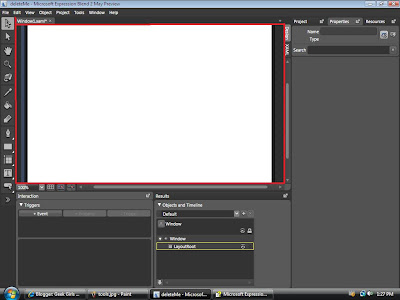
 This is the Artboard(middle giant white square). I have it highlighted in red. This is where you will be drawing and making everything.
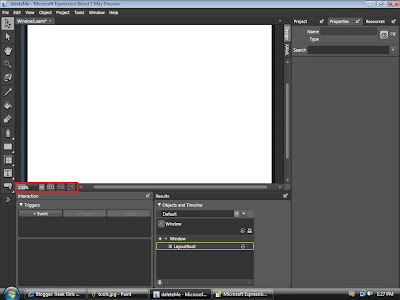
This is what you use to zoom in or turn on the grid or snap grid. Play around with it. (I personally like the ctrl spacebar click to zoom..but it does not work in blend) so this is what you will have to get used to.

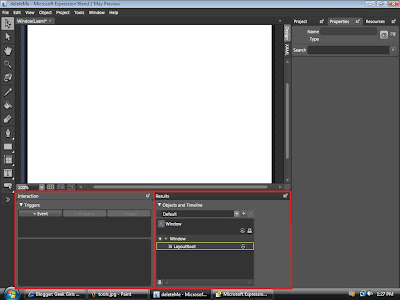
This is the interaction, results, and objects and timeline panel. as far as I understand so far.. the interaction is used to control stuff like what you want to have happen when a button is clicked (like turn on a timeline)etc. The results is output and error messages(stupid errors!) and then the trusty objects and timeline is the place where it lists what you have on the artboard and in what order. The timeline is used for animation and such things. I will go further into detail later.
This is where you can choose between design(ooo pretty) view or XAML view(yuck ugly code!)
So if you draw a circle in design view then you can look at XAML view and see the code that makes up that circle you just drew.
This is the Projects, Properties and Resources panels. Project shows you your files folders etc. Properties is where you can change the colors and properties of certain objects you make. Resources is where you will have templates you can easily apply to stuff you make so you do not have to remake the look of everything over and over.
This is the menu. (you know.. with file, edit view.. all that fun stuff)
Play around with all of the tools and things so you get somewhat of a feel as to what they do.
See ya tomorrow! :D
The New Adventures of Geek Girl in Expression Blend!!
Hi all you geeks!! Its geek girl here! For my job, I am FORCED to learn this crazy scary new program called Expression Blend. Yep.. it is very very very confusing when first learning anything in it. No matter how simple it may seem!!! It will frustrate you til you want to scream and run away...But have NO fear! Geek Girls here to do all the dirty work for you!! I will be posting everything I learn in expression from start to finish (until I am not an expression weakling newbie anymore)!! I will be using very simple non geek language so you can understand how it all works without having to decipher a word of it! So check back every so often and you might just run across something you need to know so you TOO can be on your way to geeky stardom!
Wish Me Luck!!
Wish Me Luck!!
Subscribe to:
Posts (Atom)


